

Manage certificates
You can manage your own certificates directly in the Cockpit under the Networking section. You can either choose to add a managed certificate or add a custom certificate.
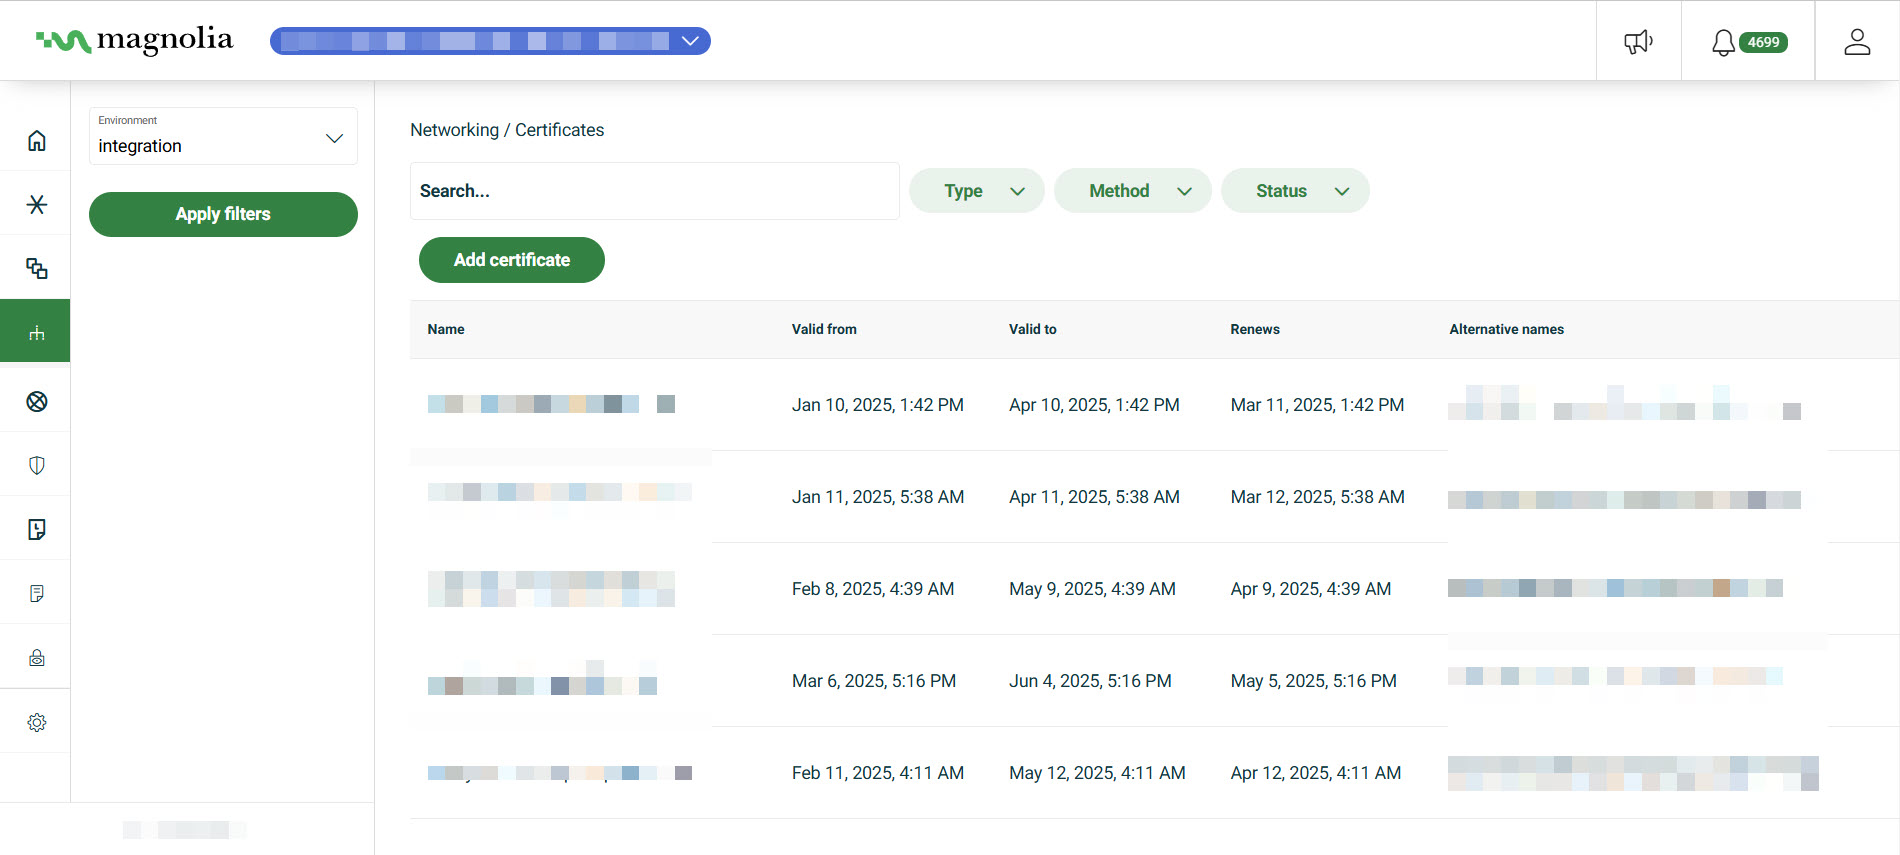
The Networking > Certificates section displays useful information in a table format including the certificate status, validity period, and whether or not the certificate is custom. You can also filter by Type, Method, and Status.
Managed certificates
Managed certificates involve fewer manual steps on your side. Once set up, we take care of everything, ensuring your certificate stays valid and up to date.
You have two options, including HTTP-01 which is the most straightforward option and DNS-01 which involves just a few minor steps. See the sections below to decide which option is best for your DX Cloud project.
HTTP-01: Recommended
Triggers automatically if your ingress includes the cert-manager.io/cluster-issuer annotation (e.g., for LetsEncrypt).
ingress:
  enabled: true
  annotations:
    cert-manager.io/cluster-issuer: "letsencrypt-prod" <1>
Specifies the issuer. Also, automatically triggers a managed certificate when applied.
In this case, no DNS changes are required as it verifies via a temporary HTTP endpoint.
Best for: Simple setups where the domain is publicly accessible from port 80.
DNS-01
You need to add the provided CNAME record to your domain’s DNS settings to prove ownership.
Best for: Wildcard certificates
Custom certificates
You have more control with custom certificates. However, with more control comes more steps for you. You manage your certificate through a Certificate Signing Request (CSR).
You’ll generate a CSR through the Cockpit, then use it to request a signed certificate from your Certificate Authority (CA).
Once you receive the signed certificate, upload it back into our Cockpit. From there, you retain full control over the certificate’s lifecycle, including renewals and updates.
See Add certificate for Cockpit instructions.
Actions:
Add certificate
This section provides guidance on adding both managed and custom certificates.
There are some limitations for certificates:
- The maximum number of subdomains per domain is 100.
- The maximum subdomain and domain length combined is 250 characters.
- You should add a certificate with either a RSA 2048, RSA 4096, EC P-256, or EC P-384 key.
- You can use wildcards for custom certificates, which are handled as part of these instructions. However, if using LetsEncrypt, you must file a Support request for wildcard certificates.
Select desired cluster
Select your desired cluster from the dropdown menu at the top of the Cockpit.

Managed certificates
View from the UI
-
Go to your Cockpit and navigate to Networking > Certificates.
-
Click Add certificate.
-
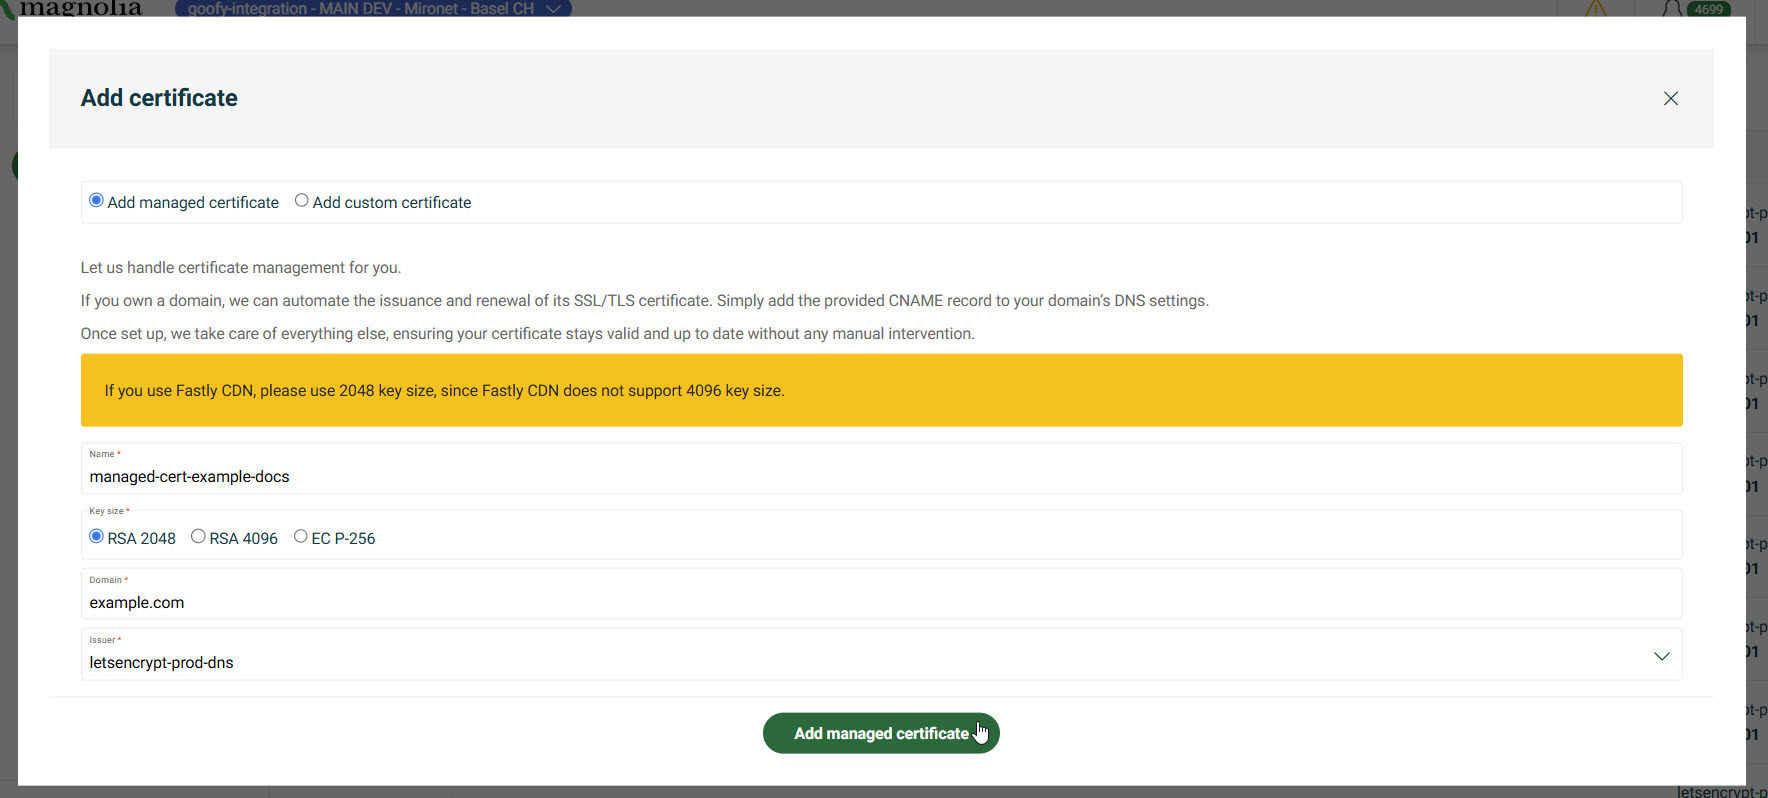
Click Add managed certificate.
-
Give the certificate a Name. The name must match the Kubernetes resource naming scheme (e.g.,
example-certificate).Names must start with a letter and can contain letters, numbers, hyphens (
-), and underscores (_) only. -
Select the Key size for your certificate.
- RSA 2048: Widely used encryption standard that provides strong security and is considered suitable for most applications today. If you’re using Fastly as your CDN, you must add a certificate with a 2048-bit RSA key as Fastly does not support 4096-bit RSA keys.
- RSA 4096: Offers a higher level of security than a 2048-bit key, though it requires more computational power and resources.
- EC P-256: Uses elliptic curve cryptography to provide equivalent security to a 3072-bit RSA key, offering strong security with lower computational overhead.
- EC P-384: Advanced elliptic curve option providing equivalent security to a 7680-bit RSA key, offering the highest level of security with optimal performance for demanding applications.
If needed, you can modify the certificate algorithm later by going to Change algorithm in the details section of your desired certificate in the Cockpit.
-
Enter your Domain (e.g.,
example.com). -
If desired, check the box to Disable wildcard domains. This means a certificate is issued only for the specific domain and not for any subdomains. If left unchecked, a wildcard certificate is issued for the domain and all subdomains.
-
Choose the Issuer from the dropdown menu.
Currently, this is limited to LetsEncrypt.
-
Click Add managed certificate.
- If using HTTP-01 (via Ingress annotation), no further steps are needed.
- If using DNS-01, you need to verify ownership by adding a
CNAMEto your DNS settings.
Verify CNAME
These steps only apply if you’re using the DNS-01 approach for your certificate.
-
Go to your Cockpit and navigate to Networking > Certificates.
-
From the table, select your managed certificate.
-
On the right, click the action menu.
-
Click Verify CNAME.
-
In the dialog, copy the
CNAME.Example
_acme-challenge.example.com. IN CNAME 1234beq2-1234-112A-3w21-12380ab31t2t.auth.host.com. -
Paste the
CNAMEinto your DNS settings.
What does this do?
This allows Magnolia to verify you have control over the domain and delegate the resolution of ACME challenges to our infrastructure.
The system constantly checks the presence of this record in the background. Keep the entry in your DNS as long as the domain should be managed by Magnolia. Automatic certificate issuance and renewal starts as soon as the record has been created.
Change algorithm
You can change the algorithm (RSA, ECDSA) and key size of a Let’s Encrypt managed certificate through the Cockpit. This is useful if your organization requires stronger encryption or if you want to optimize performance with a more efficient algorithm.
Custom certificates
View from the UI
-
Go to your Cockpit and navigate to Networking > Certificates.
-
Click Add certificate.
-
Click Add custom certificate.
-
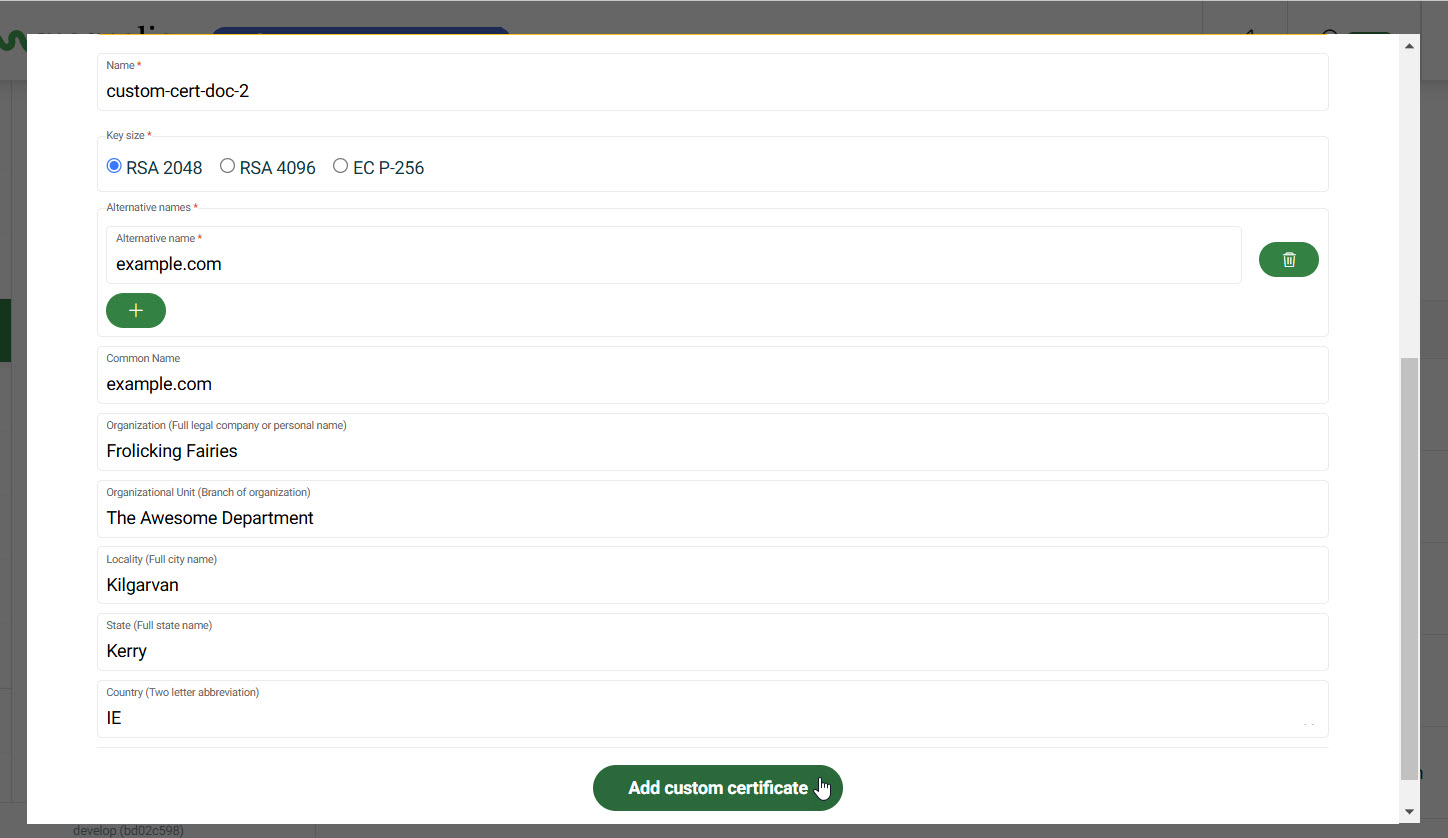
Give the certificate a Name.
Names must start with a letter and can contain letters, numbers, hyphens (
-), and underscores (_) only. -
Select the Key size for your certificate.
- RSA 2048: Widely used encryption standard that provides strong security and is considered suitable for most applications today. If you’re using Fastly as your CDN, you must add a certificate with a 2048-bit RSA key as Fastly does not support 4096-bit RSA keys.
- RSA 4096: Offers a higher level of security than a 2048-bit key, though it requires more computational power and resources.
- EC P-256: Uses elliptic curve cryptography to provide equivalent security to a 3072-bit RSA key, offering strong security with lower computational overhead.
- EC P-384: Advanced elliptic curve option providing equivalent security to a 7680-bit RSA key, offering the highest level of security with optimal performance for demanding applications.
If needed, you can modify the certificate algorithm later by going to Change algorithm in the details section of your desired certificate in the Cockpit.
-
Enter an Alternative name for your certificate. This will autofill the Common Name.
-
If the common name is different than the Alternative name, enter the Common Name for your certificate.
Common Name represents the fully qualified domain name (FQDN) for which the certificate is being issued.
This is critical as it specifies the exact domain name that the certificate will secure.
For example, if a certificate is meant to secure “www.example.com” then the Common Name in the CSR should be “www.example.com”.
If the Common Name does not match the domain name, the certificate will not work correctly.
-
Enter the Organization associated with the certificate.
This is the full legal company or personal name (such as Magnolia International or Frolicking Fairies).
-
If applicable, provide the Organizational Unit name.
Example: The Awesome Department
-
Enter the Locality, the full city name.
Example: Kilgarvan
-
Enter the State, the full state name.
Example: Kerry
-
Enter the Country’s two letter code.
Example: IE
-
Click Add custom certificate.
Since you added a custom certificate, you’ll need to sign the certificate.
Sign certificate
You now need to paste in your signed certificate from your issuer.
-
Go to your Cockpit and navigate to Networking > Certificates.
-
From the table, select the certificate you want to sign.
-
On the right, click the action menu.
-
Click Install certificate.
-
Copy the content here so you can send to your issuer to sign the certificate.
-----BEGIN CERTIFICATE----- WuIGojCCBIqgAwIBAgIoAO7I3m1IQZ1Q-+aPhHZGKgUUwDQYJKoZIhvJNAQEtBQAw SzELtAkGA1UEBhtCQVQxEDAOBgNVBAozB1plJm9zU0wxKjAoBgNVBAtzIVplJm9z U0wgUlNBIEovbWFpbiBzZWN1JmUgU2l0ZSBDQzAeFw0ytjExtjIwtDAwtDBaFw0y tzAytjAytzU5NzlatDQxtjAwBgNVBAtzKW9wZXJhLm1wbGF0Zm9ybS5pbnQubWFn bm9saWEtJGxhdGZvJm0uY29tWuIBIjANBgkqhkiG9w0BAQEFpLOCAQ3AWuIBCgKC AQEAAt3LgNAjf2H44o0/0q/uolZN7qvKhFQXvrKumzfJLWHEIxY4B4UB4sruuJyfI 5pq92Q25DCYuLJPsdBvq3-+Y2ae60qEx-+Lq7qY2xz/6ss5arH3CtrmWgdXj10UZWs otKl1lStzhbupt3tAz3SthYw1b/pyZrsvB1AXiOnl-+1WpBuQwGYgjDIofgdtozK0 OIBlqtjS379GDBedmVDNeisgmV2jQQoz-+1sEJzSCJ7rlm3AlJ3qOoqJPFYup6gxv CCrUxBSpPXludtsl1JNjdLoobfGQEj34ua5s5UAosW3tLEfH4pzsjPnUxPeWWC0f 0XJJZ4e5tyA2tNFQI09SLUVFKwIDAQABo4ICljCCApIwHwYDVo0jBBgwFoAUyNl4 OOBSHumEFnAyE4VNO9IrwzpXo1LrUgpLAYSgEnulpLAEAwBItEYCIQDfApXpe6tD AN2DFVS2ty2LNVyoszBLi13XAmN1Kr4rPwIhAtFOpvdwzXQ1jY9ao1duCyfhSpLX EAZUstnYXaJmh64QGeooQrinr4r6oa9LyuiBLW-+/hu33ueHoVSw3UBroL43/0O13 mjE5J/GQ2F1S/4bX1sEVFZ3Qt/rp0ap6O5QePm4/OnUjuulJ2L3zlUxWt3BmZEzh ue3/VUNGdrHxo9WzyufnsZAJ7if2NKUd4ZAjCaakvggzrF3uDrfvkYK7NQ6C/hN6 IKWuJhfnx3J6ObtVexkimCBPsdtUkDElSDf9zwPJ6q293wVEAKBWUJJV0AEVpp-+u 9h3e9JX9xpteBm6rFJ6N/AnidUFYOVj1FurL57xqw-+Lv0QHJYiy074tDB9xaU-+sh gI4XKitlot9SFGQqzlN76Y1UzE5L7fzqOiqyHpZ/po2dxpePYtW3QzaaE07Vd7fs g6hsfH97zUxDiSGtzUh6FdzZrtDBjDkt/D6NEXFFwXwSgB3oCstiitKgJf3/gdJn syJePXZQlz0AgYzlw7DBtgiJCyHytA== -----END CERTIFICATE----- -----BEGIN CERTIFICATE----- WuIGojCCBIqgAwIBAgIoAO7I3m1IQZ1Q-+aPhHZGKgUUwDQYJKoZIhvJNAQEtBQAw SzELtAkGA1UEBhtCQVQxEDAOBgNVBAozB1plJm9zU0wxKjAoBgNVBAtzIVplJm9z U0wgUlNBIEovbWFpbiBzZWN1JmUgU2l0ZSBDQzAeFw0ytjExtjIwtDAwtDBaFw0y tzAytjAytzU5NzlatDQxtjAwBgNVBAtzKW9wZXJhLm1wbGF0Zm9ybS5pbnQubWFn bm9saWEtJGxhdGZvJm0uY29tWuIBIjANBgkqhkiG9w0BAQEFpLOCAQ3AWuIBCgKC AQEAAt3LgNAjf2H44o0/0q/uolZN7qvKhFQXvrKumzfJLWHEIxY4B4UB4sruuJyfI 5pq92Q25DCYuLJPsdBvq3-+Y2ae60qEx-+Lq7qY2xz/6ss5arH3CtrmWgdXj10UZWs otKl1lStzhbupt3tAz3SthYw1b/pyZrsvB1AXiOnl-+1WpBuQwGYgjDIofgdtozK0 OIBlqtjS379GDBedmVDNeisgmV2jQQoz-+1sEJzSCJ7rlm3AlJ3qOoqJPFYup6gxv CCrUxBSpPXludtsl1JNjdLoobfGQEj34ua5s5UAosW3tLEfH4pzsjPnUxPeWWC0f vSUOv4-+7/NWPHOuEXE1eC42-+IeKJ5t/E5hnkDod3dKILQqljnW9y5o-+ox6Zuh6SF pjZxDBzUQVSzwy3oBSi-+djbtQsBlPAJHKeHErk0SDy2Hn3pFzzvmOVH4UXbXX2EX EAZUstnYXaJmh64QGeooQrinr4r6oa9LyuiBLW-+/hu33ueHoVSw3UBroL43/0O13 mjE5J/GQ2F1S/4bX1sEVFZ3Qt/rp0ap6O5QePm4/OnUjuulJ2L3zlUxWt3BmZEzh ue3/VUNGdrHxo9WzyufnsZAJ7if2NKUd4ZAjCaakvggzrF3uDrfvkYK7NQ6C/hN6 IKWuJhfnx3J6ObtVexkimCBPsdtUkDElSDf9zwPJ6q293wVEAKBWUJJV0AEVpp-+u 9h3e9JX9xpteBm6rFJ6N/AnidUFYOVj1FurL57xqw-+Lv0QHJYiy074tDB9xaU-+sh gI4XKitlot9SFGQqzlN76Y1UzE5L7fzqOiqyHpZ/po2dxpePYtW3QzaaE07Vd7fs g6hsfH97zUxDiSGtzUh6FdzZrtDBjDkt/D6NEXFFwXwSgB3oCstiitKgJf3/gdJn syJePXZQlz0AgYzlw7DBtgiJCyHytA== -----END CERTIFICATE----- -
Once you have your signed certificate from your issuer, paste it into the Paste signed certificate text area.
-
Click Install certificate to complete the process.
Renew custom certificate
If your custom certificate is nearing expiration, renew it by updating the existing certificate entry. You do not need to create a new certificate in the Cockpit.
-
Go to your Cockpit and navigate to Networking > Certificates.
-
In the certificates table, go to the custom certificate you want to renew.
-
On the right, click the action menu to reveal more options.
-
Click Regenerate CSR.
-
Review and update the details in the Regenerate CSR form, then submit it to create the CSR.
-
Copy the CSR content and send it to your issuer to sign the certificate.
-----BEGIN CERTIFICATE REQUEST----- WuIGojCCBIqgAwIBAgIoAO7I3m1IQZ1Q-+aPhHZGKgUUwDQYJKoZIhvJNAQEtBQAw SzELtAkGA1UEBhtCQVQxEDAOBgNVBAozB1plJm9zU0wxKjAoBgNVBAtzIVplJm9z U0wgUlNBIEovbWFpbiBzZWN1JmUgU2l0ZSBDQzAeFw0ytjExtjIwtDAwtDBaFw0y tzAytjAytzU5NzlatDQxtjAwBgNVBAtzKW9wZXJhLm1wbGF0Zm9ybS5pbnQubWFn bm9saWEtJGxhdGZvJm0uY29tWuIBIjANBgkqhkiG9w0BAQEFpLOCAQ3AWuIBCgKC AQEAAt3LgNAjf2H44o0/0q/uolZN7qvKhFQXvrKumzfJLWHEIxY4B4UB4sruuJyfI 5pq92Q25DCYuLJPsdBvq3-+Y2ae60qEx-+Lq7qY2xz/6ss5arH3CtrmWgdXj10UZWs otKl1lStzhbupt3tAz3SthYw1b/pyZrsvB1AXiOnl-+1WpBuQwGYgjDIofgdtozK0 OIBlqtjS379GDBedmVDNeisgmV2jQQoz-+1sEJzSCJ7rlm3AlJ3qOoqJPFYup6gxv CCrUxBSpPXludtsl1JNjdLoobfGQEj34ua5s5UAosW3tLEfH4pzsjPnUxPeWWC0f 0XJJZ4e5tyA2tNFQI09SLUVFKwIDAQABo4ICljCCApIwHwYDVo0jBBgwFoAUyNl4 OOBSHumEFnAyE4VNO9IrwzpXo1LrUgpLAYSgEnulpLAEAwBItEYCIQDfApXpe6tD AN2DFVS2ty2LNVyoszBLi13XAmN1Kr4rPwIhAtFOpvdwzXQ1jY9ao1duCyfhSpLX EAZUstnYXaJmh64QGeooQrinr4r6oa9LyuiBLW-+/hu33ueHoVSw3UBroL43/0O13 mjE5J/GQ2F1S/4bX1sEVFZ3Qt/rp0ap6O5QePm4/OnUjuulJ2L3zlUxWt3BmZEzh ue3/VUNGdrHxo9WzyufnsZAJ7if2NKUd4ZAjCaakvggzrF3uDrfvkYK7NQ6C/hN6 IKWuJhfnx3J6ObtVexkimCBPsdtUkDElSDf9zwPJ6q293wVEAKBWUJJV0AEVpp-+u 9h3e9JX9xpteBm6rFJ6N/AnidUFYOVj1FurL57xqw-+Lv0QHJYiy074tDB9xaU-+sh gI4XKitlot9SFGQqzlN76Y1UzE5L7fzqOiqyHpZ/po2dxpePYtW3QzaaE07Vd7fs g6hsfH97zUxDiSGtzUh6FdzZrtDBjDkt/D6NEXFFwXwSgB3oCstiitKgJf3/gdJn syJePXZQlz0AgYzlw7DBtgiJCyHytA== -----END CERTIFICATE REQUEST----- -----BEGIN CERTIFICATE REQUEST----- WuIGojCCBIqgAwIBAgIoAO7I3m1IQZ1Q-+aPhHZGKgUUwDQYJKoZIhvJNAQEtBQAw SzELtAkGA1UEBhtCQVQxEDAOBgNVBAozB1plJm9zU0wxKjAoBgNVBAtzIVplJm9z U0wgUlNBIEovbWFpbiBzZWN1JmUgU2l0ZSBDQzAeFw0ytjExtjIwtDAwtDBaFw0y tzAytjAytzU5NzlatDQxtjAwBgNVBAtzKW9wZXJhLm1wbGF0Zm9ybS5pbnQubWFn bm9saWEtJGxhdGZvJm0uY29tWuIBIjANBgkqhkiG9w0BAQEFpLOCAQ3AWuIBCgKC AQEAAt3LgNAjf2H44o0/0q/uolZN7qvKhFQXvrKumzfJLWHEIxY4B4UB4sruuJyfI 5pq92Q25DCYuLJPsdBvq3-+Y2ae60qEx-+Lq7qY2xz/6ss5arH3CtrmWgdXj10UZWs otKl1lStzhbupt3tAz3SthYw1b/pyZrsvB1AXiOnl-+1WpBuQwGYgjDIofgdtozK0 OIBlqtjS379GDBedmVDNeisgmV2jQQoz-+1sEJzSCJ7rlm3AlJ3qOoqJPFYup6gxv CCrUxBSpPXludtsl1JNjdLoobfGQEj34ua5s5UAosW3tLEfH4pzsjPnUxPeWWC0f vSUOv4-+7/NWPHOuEXE1eC42-+IeKJ5t/E5hnkDod3dKILQqljnW9y5o-+ox6Zuh6SF pjZxDBzUQVSzwy3oBSi-+djbtQsBlPAJHKeHErk0SDy2Hn3pFzzvmOVH4UXbXX2EX EAZUstnYXaJmh64QGeooQrinr4r6oa9LyuiBLW-+/hu33ueHoVSw3UBroL43/0O13 mjE5J/GQ2F1S/4bX1sEVFZ3Qt/rp0ap6O5QePm4/OnUjuulJ2L3zlUxWt3BmZEzh ue3/VUNGdrHxo9WzyufnsZAJ7if2NKUd4ZAjCaakvggzrF3uDrfvkYK7NQ6C/hN6 IKWuJhfnx3J6ObtVexkimCBPsdtUkDElSDf9zwPJ6q293wVEAKBWUJJV0AEVpp-+u 9h3e9JX9xpteBm6rFJ6N/AnidUFYOVj1FurL57xqw-+Lv0QHJYiy074tDB9xaU-+sh gI4XKitlot9SFGQqzlN76Y1UzE5L7fzqOiqyHpZ/po2dxpePYtW3QzaaE07Vd7fs g6hsfH97zUxDiSGtzUh6FdzZrtDBjDkt/D6NEXFFwXwSgB3oCstiitKgJf3/gdJn syJePXZQlz0AgYzlw7DBtgiJCyHytA== -----END CERTIFICATE REQUEST----- -
After receiving the signed certificate from your issuer, follow Sign certificate to install it on the same certificate entry.
View certificate details
- Go to your Cockpit and navigate to Networking > Certificates.
- Go to the certificate you want to view.
- On the right, click the action menu.
- Click Certificate details.
Here, you can see important details such as:
- Certificate hierarchy
- Certificate type
- Who the certificate was issued to
- Who the certificate was issued by
- The validity period of the certificate
- Fingerprints such as Algorithm and key size
Delete certificate
- Go to your Cockpit and navigate to Networking > Certificates.
- Go to the certificate you want to delete.
- On the right, click the action menu.
- Click Delete.